

Dryer duct cleaning is essential for maintaining the fresh atmosphere of your home. Dirty dryer ducts or dryer vent not only reduce the performance of your dryer. In addition, it also the mix of warmth and amassed dryer build-up and residue can prompt a fire risk. In the US, the thousands of fire in the home is due to dirty, or clogged dryer vents. And this will badly harm the people of the United States. So, to overcome this problem dryer duct cleaning process is necessary to be taken to ensure the safety of your home and your loved ones.
Dryer Duct Cleaning: Important Facts you Should Know:
Before discussing the steps to How to clean the dryer vents? You should know about some important facts that How important is dryer duct cleaning for your and your health. When your dryer duct or dryer vent becomes dirty and clogged. It will decrease wind current and power the dryer to work more enthusiastically, which can cause Higher energy utilization, a Decrease in the life expectancy of your machine, the temperature of the dryer increment significantly, Sped up indoor regulator disappointment.
Moreover, Cleaning the dryer vent will scrub the framework, eliminating all garbage that has developed over the long run. Cleaning the dryer vent is a frequently neglected, yet significant advance in keeping up your home or building. A decent general guideline is to have dryer vent and air duct cleaning performed simultaneously.
Warning Signs: Have you know?
Some important warning signs that every homeowner should know for better performance, and efficiency of their dryer are.
- Your vent hood fold doesn’t open during a dryer’s activity.
- Garments that are strangely hot to the touch subsequent to drying
- You feel the dirty, irritating, and musty smell from your dryer.
- Drying times that outperform 35-40 minutes.
- It has passed a long time since your dryer duct cleaning.
Considering all these warning signs you should take steps to clean your dryer. So, that you surely enhance the proficiency and working of your dryer. Cleaning the dryer vent permits garments to dry all the more rapidly and equally. Moreover, proper cleaning makes significant serenity by wiping out a potential fire danger. It also limits shape, build-up, and different microbes on your garments and in your home.
STEPS TO CLEAN DRYER DUCTS:
In case you’re on tidying uptear in the launderette, you should handle the garments dryer vent. Realizing how to clean a dryer vent isn’t simply an issue of tidiness, yet of wellbeing: Dryer duct cleaning must be performed once per year, and it’s a straightforward undertaking you can handle at home when you a few free hours. Because Dirty dryer vents are the main source of homegrown dryer fires. Let’s see 5 easy steps of cleaning the dryer duct.
Gather all your Cleaning Tools:
This is a very important step to be considered. Make sure that you have a complete kit of cleaning tools and they are working properly or not. If the tool or equipment is not efficient then it will not give a satisfactory result. and your dryer remains dirty and clogged. That’s why we ductgurus uses a reliable tool for better performance and results. here are some tools that you will need.
- Electrical Tape
- Dryer vent vacuum
- Power drill
- Drill Attachment duct brush
- Dryer Safety Alarm
- Dryer Duct Cleaning Kit
Eliminate The Lint Trap Filter and Clean:
Now it’s time to remove the lint trap filter for dryer duct cleaning. You should clean the lint trap filter ought to be regularly cleaned before each dry cycle. Clean the build-up trap vent by clearing off all build-up on the screen with a paper towel. Because Ordinary upkeep is a viable method to forestall build-up development in your dryer. Furthermore, dryer sheets can leave small particles of dust on your build-up trap channel that develops with each cycle. If so for you, clean the channel with a scour brush and warm water with a dish cleanser. At that point, wash off with water and dry with a new towel.
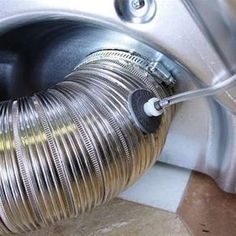
Apply Vacuum On Lint Trap Housing:
So, the next step is to vacuum the lint trap Housing. When all the traps are removed, it is time to clean the lint trap housing. For this, you should use a dryer duct cleaning kit that includes brushes of different types. Most important thing is that if you are an allergic or asthma patient then use a safety mask to avoid dust and pollution. Utilizing a long adaptable brush, relax any stuck build-up in and around the opening. By tenderly curving and pivoting the brush, you’ll have the option to get out extreme to arrive at bunches of soil.
Disconnecting Dryer:
After this, disconnect your dryer, and clean the duct properly and remove all the small particles of dust and dirt. Turn off the gas valve. Detach the pipe joint nearest to the dryer, at that point delicately pull the dryer away from the divider. Detach the excess uncovered segments of the dryer duct. If the areas are taped, eliminate and dispose of the tape.
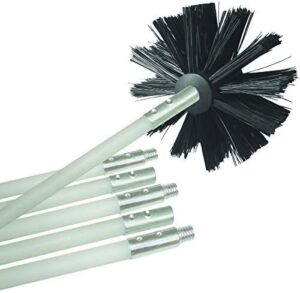
Clean out the Duct Properly:
Now it’s the time for proper dryer duct cleaning. Wear gloves properly for safety and remove all the lint, dust, dirt from the duct with the help of a long flexible brush. After that use a long bristle brush to clearly remove the trapped lint. Push and pull the long coiled brush completely until it reaches the last corner of the duct. At that point, pull out the curled brush on the opposite side. Rehash this stage a few times to push out however much build-up from the duct as could reasonably be expected.
Then, head outside and unscrew the outside vent cover from your home. Vacuum and brush from an external perspective as you accomplished for within. Make certain to clear and dismiss the vent cover too.
Reattach the ductwork:
After performing all the steps of cleaning its the time to reattach the ductwork. Prior to reattaching, make certain to watch that your pipe is flawless and no harm was finished. At that point, fix the duct to the dryer and the external clip with a screwdriver. Then, seal the channel to the two zones utilizing adaptable foil conduit tape. Try not to utilize customary plastic conduit tape since it dries out over the long run.
Ductgurus is the one who makes your dryer vent work for a long time. We use the latest technologies and tools for better results. We offer both residential and commercial duct cleaning.